How to Create the Perfect Gallery Wall
By William Tolan
Creating a gallery wall can be an intimidating task to take on, but the truth is that it can be both a fun and practical way to make any wall in your home stand out with your own personal touch.
From family photographs to art pieces that speak to you, a gallery wall can be anything you want it to be. Here is a closer look at how you can make a statement with your own wall.
Figure out what you are trying to convey
![“Framed ticket stubs, maps of favorite vacation spots, personal jokes, inside jokes - anything that will spark a memory for them or [start a] conversation with others,” said Prall, who owns Rustopia Consulting.](https://artmill.blob.core.windows.net/cms/image/5c82c00bece0401da35bbf91e62d7a7f/Picture1_1.png)
Photo Credit: Hilary Prall / Rustopia Consulting
Before you get started with your gallery wall, you must decide what type of imagery you want to go for. A gallery wall can be made up of anything such as photographs, artwork, sculptural pieces or even mementos. Home style consultant Hilary Prall said she always emphasizes to her clients that it is a good idea to choose pieces that are personal to them.
“Framed ticket stubs, maps of favorite vacation spots, personal jokes, inside jokes - anything that will spark a memory for them or [start a] conversation with others,” said Prall, who owns Rustopia Consulting.
There is no wrong answer to what can be included in your gallery wall. For example, you can give it a theme such as using your photos from your past travels or you can simply use artwork you like.
“Have a good mix of sizes, shapes, textures and depths. The most fantastic gallery walls have many interesting pieces that fit together almost like a puzzle,” she said. “I think that’s why I like designing them so much, I’m able to find just the right pieces from my clients’ collections to create an almost mosaic effect.”
It is alright to spend time looking for inspiration for your wall. You can get photos from your family album, request permission from your favorite Instagram artists to use photos, look at some stock images or even visit local thrift stores or flea markets. The possibilities are endless, although Prall said she recommends keeping the size of your wall in mind as you pick your images so you can make sure it is big enough to accommodate for the pieces you choose.

Try to incorporate a color palette
As you choose the images you want for you wall, you may want to keep a color palette in mind. With a color palette you can make sure whatever goes on your wall can complement the room it is in or you can create a colorful, memorable gallery for yourself and your guests to enjoy.
Merrin Mills, who operates the interior design Instagram page roomforsix, said she tends to lean towards a neutral color palette when working on gallery walls.
“It helps create a clean, crisp feeling, even though the gallery [may not be] symmetrical,” she said.
How to solve the puzzle
![“The layout of a gallery wall is truly like a puzzle. Some people prefer their wall to have varying spaces between the pieces, but I prefer each piece to have similar spacing,” she said. “[Otherwise] it feels like the pieces of a puzzle are just slightly separated.”](https://artmill.blob.core.windows.net/cms/image/727e45a61f6348a3bff61622ede0e89b/Picture2_1.png)
Photo Credit: Merrin Mills / roomforsix
Once you have an idea of what images you want to use for your wall, it is a good idea to choose one to three of them to serve as your focal point. Mills said this will help anchor the gallery wall, which can help your gallery appear more organized once it is completed.
“The layout of a gallery wall is truly like a puzzle. Some people prefer their wall to have varying spaces between the pieces, but I prefer each piece to have similar spacing,” she said. “[Otherwise] it feels like the pieces of a puzzle are just slightly separated.”
Mills said that when she plans gallery walls, she lays all of her pieces on the floor and rearranges them until she knows the puzzle is solved. She also takes photos of her potential layouts as she experiments with the look of her gallery.
Both Mills and interior designer Sarah Weiland agree that even spacing between the images often works best. Weiland, who owns Tusk Home + Design, said the spacing should never be closer than 1.5 to 2 inches.
“I often design gallery walls that are a grid pattern and very rigid, but some of my favorite outcomes are the random layouts,” she said, advising people to have several images in various shapes and sizes such as 4-by-6, 5-by-7 and 8-by-10.
When it comes to designing her layouts, Prall said she likes to go the more organic route as well.
“There are a few design styles for hanging gallery walls [and] my personal style is very organic, meaning I don’t map out the design,” Prall said. “I let it grow outward from one focal point. I would definitely advise doing some research to determine what style best suits your taste. Once you know the style you’re most drawn to, you can come up with a plan to lay it out.”
When trying to determine which style suits your wall the best, explore these gallery wall layouts for some examples and inspiration.
Hanging your images
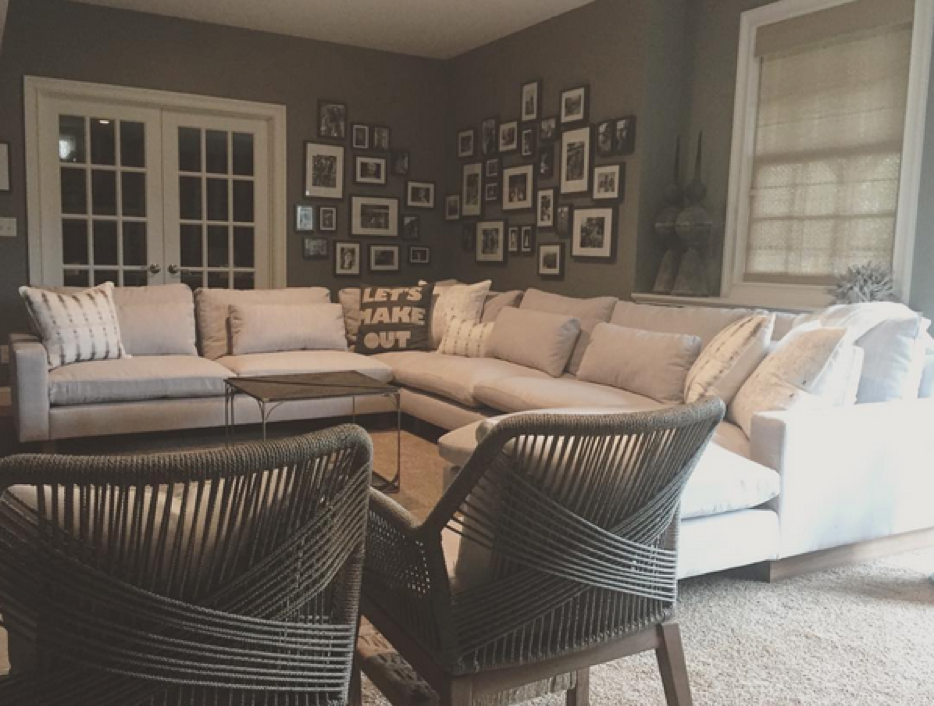
Photo Credit: Sarah Weiland / Tusk Home + Design
Once you have your images chosen and have a good idea of what the layout is going to be, the next step is to actually begin hanging.
If you are nervous about making a mistake or want to see how your ideal layout will look on your wall before beginning the hanging process, one step you can take is to create paper templates using crafting paper and painter’s tape. You can use these templates to get an idea of how your images will look when they are grouped together on your wall.
When you prepare to hang your images, it is a good idea to try and keep all of your pieces at eye level.
It is also important to make sure you have everything you need before you can begin putting together your gallery. This includes a hammer, nails, a pencil, a level, a tape measure and a screwdriver. You want to make sure that all of the pieces you want to use have hanging hardware as well.
Have fun
The last step is to, of course, have fun and enjoy the time you spend putting together your gallery wall. Remember, there is not one correct path you have to take when putting together your wall.
Don’t be afraid to experiment when putting your gallery together because as long as your wall reflects what you wanted then you did a good job putting it together.
If you want to create your own gallery wall today, explore our unique photo printing and mounting styles. Upload a photo and create ready-to-hang wall artwork. From the Floatmount to the Gallery Acrylic Facemount, our unique display options can easily be the perfect fit for your home as you create your own gallery wall. Go ahead, turn your image into art today.